Overhauling a Stromberg CD carburettor
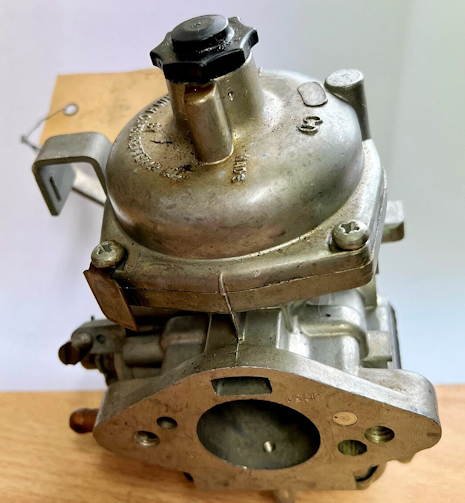
The Stromberg CD range regulates the fuel flow by moving a tapered needle in and out of an adjustable jet. The needle is fixed to the base of the air valve, which is moved by a diaphragm. The diaphragm is fitted to the air-valve body and the outside flange of the carburettor body, to form a seal between the carburettor intake and the suction chamber at the top. If a diaphragm becomes perforated or damaged, the seal is broken and the air valve cannot lift engine response is slowed considerably.
MANUAL CHOKE CONTROL
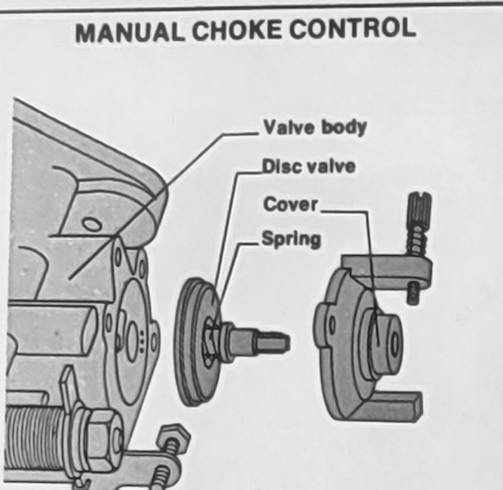
When the choke control on the car's instrument panel is pulled out, it operates an enrichening valve on the side of the carburettor body, and a fast-idle cam opens the throttle slightly to increase the engine speed. If dirt is able to get into the system it can block off the fuel regulating holes and make cold starting diffcult. Strip and clean the enrichening valve. Some Stromberg CD carburettors use a water-heated automatic choke. If this fails, overhaul it.
1. Disconnect the choke cable from the side of the carburettor. Undo the nut holding the fast-idle cam to the spindle of the enrichening valve.
2. Lift off the fast-idle cam and remove the cam spring. Note how the spring is fitted. It is important to replace the spring in the correct position.
3. Undo the two screws that hold the enrichening valve to the carburettor body, and lift out the valve assembly. This will reveal a light spring and 'C' washer.
4. Remove the 'C' washer that holds the valve disc spring, and remove the spring. This enables the two parts of the disc valve to be moved apart for cleaning. Do not try to take the discs off the spindle, The end of the spindle is burred over to secure them.
5. Make sure that the fuel regulating holes in the disc are clear. Wash the disc valve in clean petrol. Dry the valve and reassemble it so that the small regulating holes are at the bottom of the housing when the choke is in the 'on' position.
Fitting A new needle jet or diaphragm
Tools: Screwdrivers; spanners to fit the jet holder nut; pliers.
Materials: New jet; set of carburettor gaskets and seals new diaphragm, if necessary.
Fitting a new throttle spindle and butterfly involves the same procedure as a fixed jet carburettor. If the diaphragm, needle or jet need renewing, the carburettor has to be dismantled.
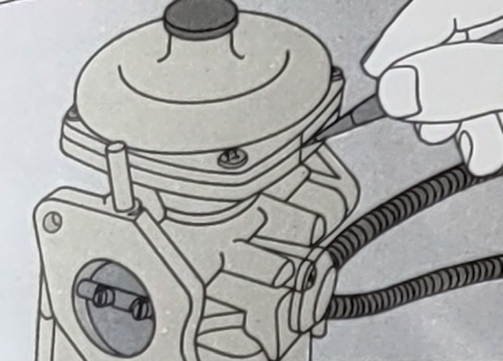
1. Scribe a line across the suction chamber and the carburettor body, so that it can be refitted in the correct position. Undo the four crossheaded screws on the top of the carburettor and lift off the chamber. Remove the air-valve return spring.
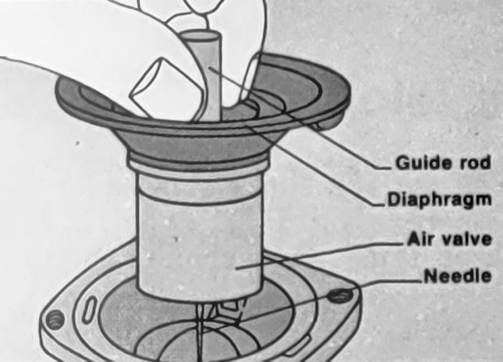
2. Lift out the air valve and the diaphragm assembly. Hold the diaphragm up to the light and stretch it to check if it is perforated. If so, a new diaphragm will have to be fitted to the air valve.
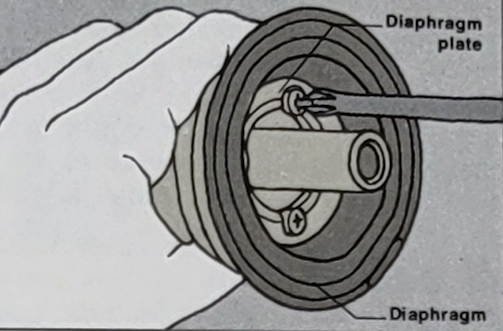
3. Undo the four screws through the centre diaphragm plate. Lift off the plate and diaphragm. Fit the new diaphragm and tighten the screws.
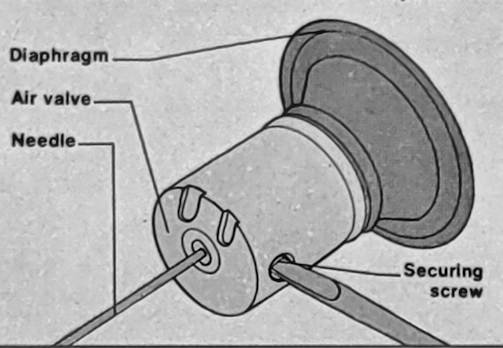
4. Loosen the needle securing screw, and remove the needle from the air valve. Fit a new needle, keeping its shoulder flush with the air-valve base. Tighten the securing screw.
5. Turn the carburettor upside-down and remove the jet adjusting screw. Undo the larger of the two nuts at the base of the float chamber and remove the jet holder, jet, jet spring and brass bush.
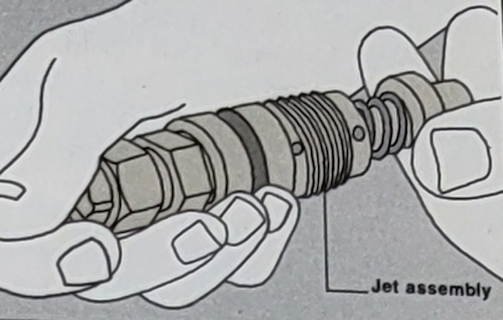
6. Fit a new jet and spring to the brass bush. Fit the assembly to the jet holder, with new washers and 'O' sealing rings. Screw the jet Jet assembly holder assembly into the body of the carburettor.
7. Fit the air-valve assembly, and make sure that the lug on the lip of the diaphragm fits into the groove on the body of the carburettor. Make sure that the needle on the bottom of the air valve fits squarely into the jet. Fit the suction chamber and tighten the chamber screws.
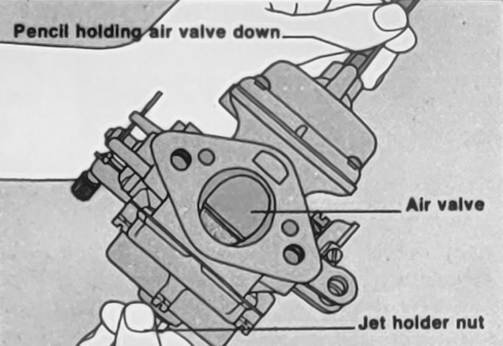
8. Lift the air valve and let it drop. If it does not give a metallic click as it strikes the jet bridge, loosen the jet holder half a turn and push the air valve down with a pencil. This will centralise the jet. Once the air valve falls freely, tighten the jet holder nut. Fit the damper and adjust the carburettor.
Renewing the float needle valve
Tools: Screwdriver; spanner to fit the needle- valve housing; pliers.
Materials: New needle valve; washers.
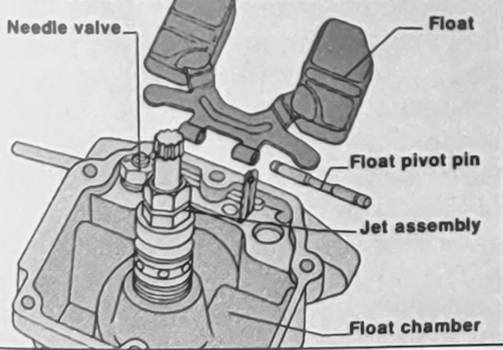
1. If fuel floods from the float chamber, undo the six float chamber screws and remove the float chamber. Remove the float pivot pin. Lift off the two floats to gain access to the hexagon-shaped needle-valve housing in the carburettor body.
2. Undo the housing and remove the complete assembly from the carburettor body. The size of the needle valve is marked on the flat section on the hexagon head of the housing.
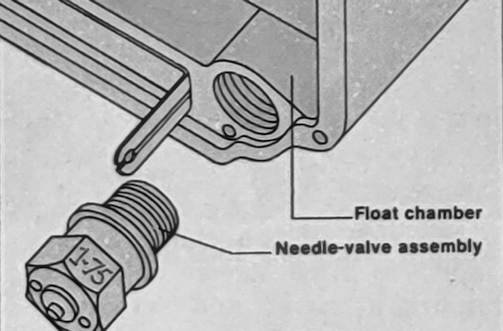
3. Use washers of the same thickness as those removed. Fit and tighten the new needle-valve assembly. Refit the float assembly and turn the complete unit upside-down.
4. Use a ruler to measure the distance between the top of the float the highest part and the body of the carburettor. It should be 16 mm. If it needs adjusting, gently bend the float arm extension until it just touches the needle valve and gives the correct float-level height. Note that the float arm extension is springy, so bend it slightly past the required point. Measure the distance and adjust if necessary. Reassemble the float chamber. Start the engine and check for flooding.
