Choke cable how to repair or replace.
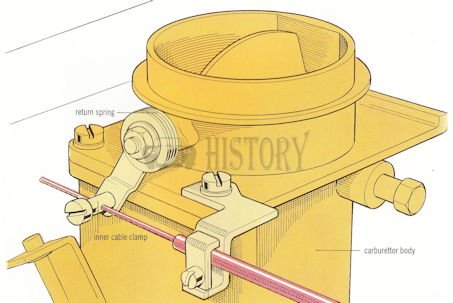
(1) Choke cable attachment on the carburettor.
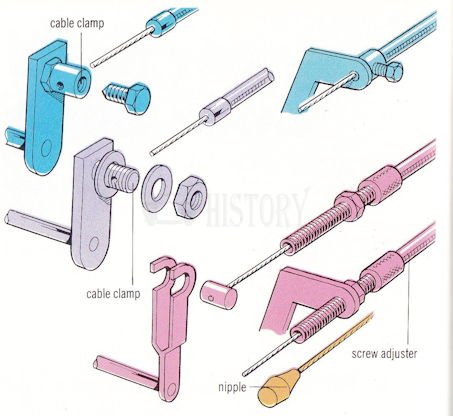
On older cars you vehicle may be fitted with a choke as most pre injection car came fitted with a carburettor, some have an automatic choke which works on water temperature but if yours has the choke cable to check first If you have not removed the air filter to check it, remove It now to allow better access to the choke linkage at the carburettor, there are usually two cables fixed to control mechanisms on the carburettor one for the throttle and one for the choke. If you are unsure which is which, get an assistant to sit in the car and press the accelerator pedal a few times. This operates the levers on the carburettor the one that does not move is the choke. Now ask the assistant to pull and push the choke knob a few times. While this happens look carefully at the cable attachment on the carburettor. There are several different types (fig 1), Make sure that both the inner and outer cables are firmly attached to the linkage and that the operating arm moves freely when the assistant pulls and pushes the knob.
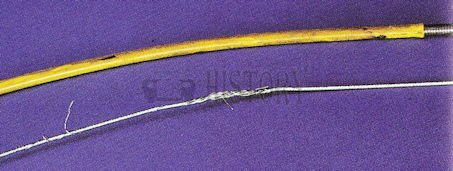
(2) Choke-cable damaged stray stands
If the outer cable moves In Its Clamp, tighten up the clamp If the inner cable has frayed between the clamp and where it is fixed to the lever, the stray stands may prevent the full movement of the choke. In this case the strands need to be cut off with pliers, or, if this falls to work, and available the complete cable should renew it (fig 2).If your cable has a sleeve on outer that fits into a housing bracket make sure It is seated properly in place Next check that the inner cable is firmly clamped to the lever on the carburettor, if it is loose it Will simply slides in and out of the clamp screw and the lever will not move. If this is the case loosen off the inner cable clamp, pull out the slack and re-tighten the cable clamp If the cable appears at first to move the end of the lever correctly but still the choke is still not working check that the lever or linkage is not come loose where it joins the carburettor. If so, tighten the nuts which hold the lever. While you have the choke cable removed it is a good idea to check the operation of the choke lever at the carburettor
Put your finger against the lever to which the inner cable fits and push the linkage to 'on when you release It should return by itself to the 'off' position. If you cannot remember which way is 'on', an easy way to make sure is to push the linkage towards the outer cable mounting. If the choke linkage does not return by itself the return spring may have become disconnected or is broken, If the lever fails to work properly after you have re-connected the spring, it is quite likely that the choke spindle is sticking in the carburettor body oil the ends of the spindle and waggle it about to free it off.
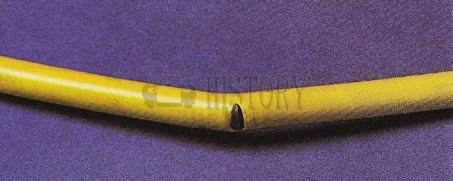
(3) choke cable kinked, twisted or damaged
If the cable is kinked, twisted or damaged in any way between the dashboard mounted knob and the carburettor It Will probably jam the choke or at least make It stick. Follow the run of the cable backwards from the carburettor towards the dashboard or steering column, keeping track of it as It passes through the bulk head If the cable is snagged or bends sharply around a component, free It and try to straighten It out with your hands as best you can You can only see fraying on a cable at the carburettor end where the Inner cable comes out of the outer one (fig 3).
However, if the choke control feels springy this is a Sign that the inner cable is frayed inside at some point along its length (fig 2) and must be renewed. If the cable run is smooth and free as far as the dash or steering column, check the large locking ring or nut securing the
cable outer behind the dash panel or steering column. This should be tight up against the panel or its mounting bracket The choke control knob is actually attached to a short piece of metal rod which is then attached to the Inner cable If this is bent It Will make the choke stiff or Impossible to operate. You should be able to straighten this by hand or with a pair of pliers. If you have made the rod as straight as you, can you might be able to make it work smoothly by finishing with a fine file The metal rod also forms the choke locking mechanism If this is faulty there is nothing you
can do to repair it at least if it is losing the choke will not remain on unnecessarily as it will tend to self-return all the time. However, if you cannot put up with holding the choke out until the engine is warm you have no alternative but to renew it.
(4) lubricate Choke cable with oil
If you are refitting the old cable, make sure you have already well lubricated it, but if you are fitting a new one you should always take few minutes to oil it first.
Hold the locking rind or nut behind the dash panel and feed the cable through it at the same time. When the cable is pulled right through, screw the locking ring on to the outer cable and tighten it up. Push the cable through the grommet in the bulkhead and lead it towards the carburettor in a series of gentle curves. Never wind the cable around other components and keep it well clear of the hot exhaust manifold and the steering column.
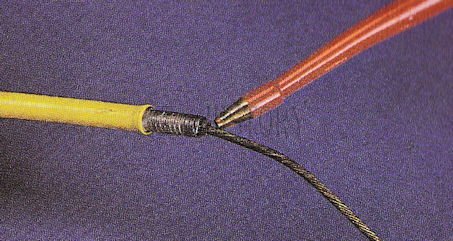
With the cable removed try moving the outer cable over the inner one to see how free it is. If it stiff or moves roughly, yet there is nothing else wrong with the cable, it may only need oiling to make it work perfectly This is worth trying before you buy a new cable By far the best method of lubrication is to use a cable oiler but if you do not have access to one of these, soak the cable In Oil by applying a few drops every five minutes while the cable is off (fig 4).
Choke cable attachment types on the carburettor.
